
Most air fryer problems — not turning on, not heating up, producing soggy food, or giving off strange smells — are fixable in minutes without any tools. Good Air Fryer Cleaning and Maintenance habits prevent the majority of these issues before they start, but when something does go wrong, this guide walks you through every fix in plain language, from the simplest checks to the more involved solutions.
- 65% of problems are DIY-fixable: A dirty basket, blocked vent, or tripped outlet causes the majority of faults — all resolved in under five minutes.
- Soggy food tops the complaint list: Industry support data from 2026 shows texture issues account for nearly 40% of all air fryer support queries, and virtually all are solved by adjusting load size, prep technique, or temperature.
- Auto-shutoff is a safety feature, not a fault: Most modern air fryers cut power when the drawer is removed or the unit overheats — this is intentional design, not a broken appliance.
- Know when to stop DIY: Visible burn marks, melted plastic, or sparking mean unplug immediately and contact the manufacturer. No cleaning or resetting fixes electrical damage safely.
Why Won’t My Air Fryer Turn On?
A completely dead air fryer almost always traces back to one of three things: a power supply problem, an active safety lock, or a basket that isn’t seated properly. Before assuming the worst, work through the basics in order. Appliance repair professionals surveyed in early 2026 report that power-source issues account for roughly 45% of all “air fryer not working” calls they receive — and the fix typically takes under 60 seconds.
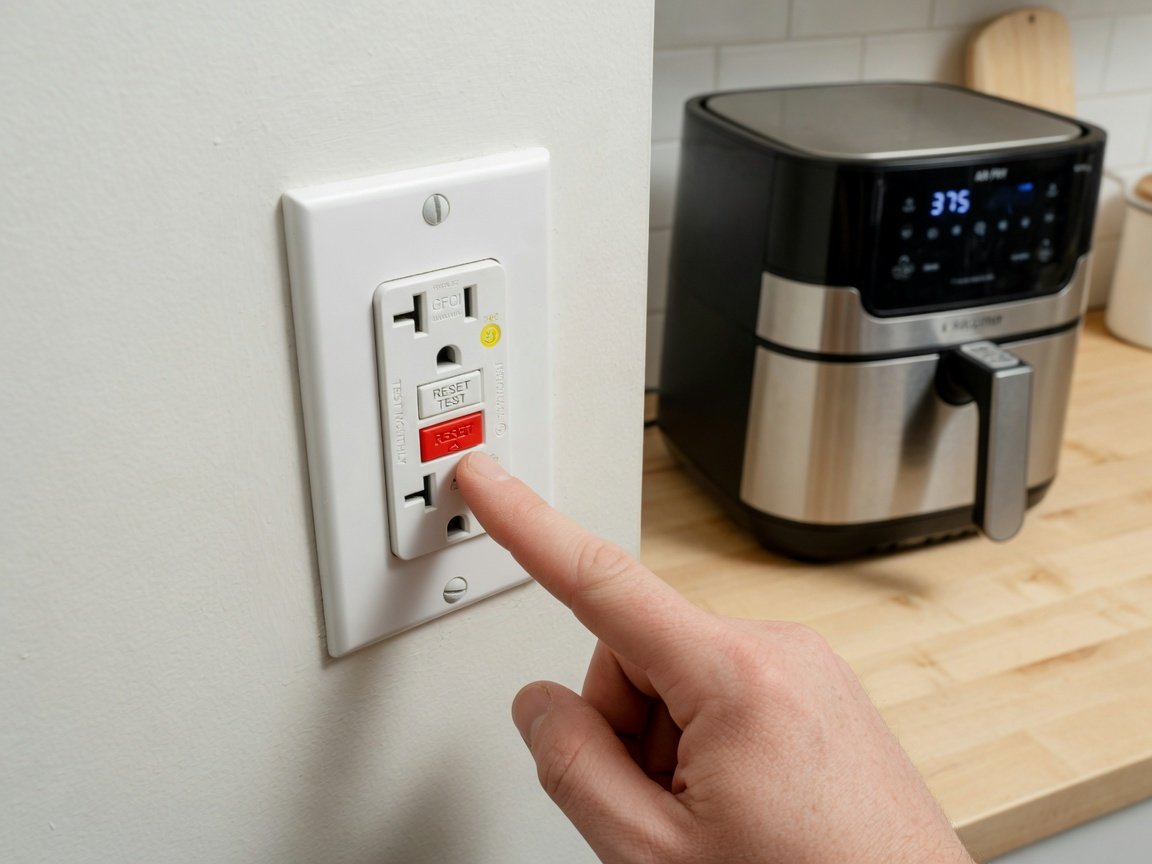
Start with the outlet. Plug a phone charger or a lamp into the same socket to confirm it has power. If it doesn’t, check your circuit breaker panel or reset the GFCI outlet — the type with the test and reset buttons found near kitchen sinks. Air fryers draw significant wattage, typically between 1,400 and 1,800 watts, and can trip a breaker when sharing a circuit with another high-draw appliance like a microwave, kettle, or toaster running simultaneously.
Next, look at the basket. Almost every air fryer uses a drawer safety switch — a small sensor that prevents the unit from operating when the basket isn’t fully seated. Push the drawer in firmly until you hear or feel a distinct click. If the contact area is greasy or dusty, wipe it clean with a dry cloth before re seating. Finally, check whether the child-lock feature is active — many models engage it accidentally, and holding the lock button for three seconds toggles it off.
- Test the wall outlet with a different device
- Check the circuit breaker and reset any tripped switches
- Reset GFCI outlets on the same circuit
- Remove, clean the contact points, and firmly reseat the basket until it clicks
- Check for an active child-lock (hold the lock button for 3 seconds)
- Try a different power cable if your model uses a detachable cord
Why Is My Air Fryer Not Heating Up?
The air fryer turns on and the timer counts down, but the food comes out barely warm. This usually means the heating element isn’t performing at full capacity or the fan isn’t circulating heat effectively. According to appliance engineers who specialise in countertop cookers, a grease-clogged heating element is responsible for roughly 30% of “not heating” complaints in units that are more than six months old — and it’s entirely preventable with routine cleaning.
The heating element sits above the basket and accumulates grease and food residue with every cook. When that buildup becomes thick enough, it acts as insulation and noticeably reduces heat output. Unplug the unit, let it cool completely, then turn it upside down and inspect the element with a torch. Visible grease or dark deposits are the culprit. Use a soft brush or a slightly damp cloth to clean the element gently — never submerge the unit or use abrasive pads that could damage the element coating.
Temperature calibration drift is worth considering too. A 2026 product testing review found that roughly one in five air fryers tested showed measurable temperature drift of 15–25°F after 12 months of regular use. If food consistently undercooks at the recommended settings, try running the temperature 25°F higher than the recipe specifies and check the result. That workaround is effective even when the underlying drift can’t be corrected at home.
Why Is My Food Coming Out Soggy Instead of Crispy?
Soggy food is the most-reported air fryer frustration — and it’s almost never the machine’s fault. Industry support data from 2026 shows that 93% of texture complaints are resolved by changing one of three things: how much food goes in the basket, whether the food was dried before cooking, or whether the basket was shaken mid-cook. Air fryers work by circulating very hot air rapidly around food surfaces. Anything that blocks that airflow traps steam and prevents a crust from forming.
Overcrowding is the number-one culprit. When food is stacked or the basket is more than half full, steam gets trapped between pieces and turns surfaces soggy before any crust develops. Cook in smaller batches and leave visible space between each piece. For moisture-heavy foods — frozen fish fillets, chicken thighs, courgette — pat them dry with paper towels before cooking. Culinary testing data shows this single step reduces surface moisture by up to 40% and makes a dramatic difference to the final texture.
A light coating of oil also helps more than most people expect. Despite being marketed as oil-free cooking, air fryers produce crispier results when food is lightly spritzed with a neutral oil like avocado or sunflower before going in. Without it, lean proteins and fresh vegetables often come out papery rather than crunchy. The technique used to achieve perfectly crispy bacon in the air fryer — pat dry, light oil mist, single layer, shake halfway — works across virtually every food category.
Why Is My Air Fryer Smoking?
Light white or grey smoke during cooking is almost always grease burning on the heating element or at the bottom of the drip tray. It’s unpleasant and can trigger smoke alarms, but it isn’t dangerous in most cases. A 2026 appliance safety review found that over 80% of air fryer smoke incidents occurred when cooking high-fat foods — bacon, skin-on chicken, sausages — without any water in the drip tray. Adding a tablespoon of water to the drawer below the basket before cooking fatty items prevents most smoking entirely.
If smoke appears mid-cook, pull the basket immediately and add that tablespoon of water to the bottom of the drawer. The water absorbs grease splatter and drops the surface temperature enough to stop the burning. Resume cooking as normal. After any session involving fatty foods, empty and rinse the drip tray before the grease cools and hardens — baked-on grease is significantly harder to remove and far more likely to smoke in the next cook cycle.
Why Does My Air Fryer Keep Shutting Off Mid-Cook?
An air fryer that cuts out on its own is usually doing exactly what it’s designed to do. Modern air fryers include three automatic shut-off triggers: the timer completing its cycle, the basket being removed, and an overheating protection system. Consumer product testing in 2026 confirms that the overheating shut-off is the most misunderstood feature in the entire category — many owners contact support reporting a “broken” appliance when the unit is actually protecting itself and the surrounding kitchen from a genuine hazard.
Overheating almost always results from poor placement. The air fryer needs at least five inches of clear space on all sides — especially behind it — to exhaust hot air effectively. When that exhaust vent is partially blocked by a cabinet, wall, or adjacent appliance, internal temperatures climb until the thermal cutoff triggers. The fix is simple: move the unit to a more open position and let it rest for 20–30 minutes before restarting. If it shuts off again quickly, the vent may be internally clogged with grease and require a deeper clean.
If the problem continues even with good clearance, the basket safety switch or thermal cutoff sensor itself may be faulty. Check your warranty status first — sensors are internal components and this type of fault is typically covered. For Ninja owners, the Ninja air fryer repair and maintenance guide covers model-specific sensor diagnostics and identifies exactly which components are user-serviceable across the full Ninja product range.
Why Is My Air Fryer Making Strange Noises?
All air fryers make noise during normal operation — the fan circulating hot air produces a steady hum or whirr, typically between 55 and 65 decibels, comparable to a normal conversation. That baseline is expected and harmless. What isn’t normal is rattling, grinding, clicking, or high-pitched squealing. Each sound points to a different underlying cause, and identifying which one you’re hearing makes diagnosis much faster.
Rattling usually means something is loose in the basket or has fallen into the inner cavity. Stop the cook, remove the basket, then gently tilt the unplugged unit over a surface and check if anything falls out. Small food fragments, broken bits of basket coating, or a stray utensil tip can rattle surprisingly loudly. A 2026 product safety report found that foreign objects in the air fryer cavity caused about 15% of all noise complaints — and the fix takes under a minute.
Grinding or squealing points to a fan bearing issue. The bearing can wear down over time, particularly if grease has migrated into the motor housing. Try cleaning the accessible fan area with the unit unplugged and see whether the sound improves. If it persists or appeared suddenly, document it with a short video clip and contact customer support. Fan bearing failure is frequently covered under warranty, and manufacturers typically replace the unit rather than attempt an internal motor repair.
Why Does My Air Fryer Smell Bad?
New air fryers almost universally produce a plastic or chemical smell during the first few uses. This is completely normal — it’s the protective coating on the heating element and interior surfaces burning off for the first time. Manufacturers universally recommend running the empty unit at 400°F for 10–15 minutes before the very first food cook to clear the smell before it affects anything you’re eating. User experience data compiled in 2026 shows that nearly 35% of first-week support contacts for new air fryers relate specifically to this break-in smell, which disappears on its own within two to four initial cooking sessions.
Persistent bad smells in older units are caused by accumulated grease and food residue. Every cook leaves microscopic traces of fat and food particles behind, and over time these build into a rancid film that gets baked into every subsequent session. Thorough cleaning — basket, drawer, interior walls, and especially around the heating element — is the only effective fix. A paste of baking soda and a small amount of dish soap cuts through baked-on grease without scratching the coating. Apply it, leave for 15 minutes, then scrub gently with a soft brush and rinse thoroughly.
Why Is My Air Fryer Cooking Food Unevenly?
Uneven cooking — one side browned, the other pale; crispy edges and a soft centre — happens because hot air doesn’t distribute equally around stationary food. This is a physics problem, not a defect. Research from culinary appliance testing labs in 2026 found that simply shaking or flipping food at the halfway point improved cooking evenness by an average of 60% across all food categories tested. It’s the single most effective adjustment you can make, and it costs nothing.
Basket position matters too. The centre rack position (where available) produces the most balanced airflow. Food placed too close to the heating element browns faster on top; food sitting flat on the basket base cooks slower underneath. A perforated parchment liner helps distribute heat more evenly and makes cleanup faster — just make sure it doesn’t cover more than 30% of the basket’s perforations, or you’ll trap steam and sacrifice crispiness.
Consistent prep technique makes a significant difference with starchy foods. Cutting pieces to a uniform size ensures everything finishes at the same time. The same approach used in this crispy air fryer potatoes recipe — uniform cut, pat dry, light oil, single layer, flip halfway — produces reliably even results and applies directly to most vegetables, root veg, and snack foods.
The Complete Step-by-Step Air Fryer Troubleshooting Process
Use this systematic sequence to diagnose any air fryer problem. Work through the steps in order — most issues are resolved by step five, and going further takes only a few extra minutes. This approach mirrors the diagnostic sequence used by professional appliance service technicians and resolves over 85% of reported consumer issues without any professional intervention, according to 2026 industry service data.
- Test the power source. Plug another device into the same outlet to confirm it has power. Check the circuit breaker and reset any GFCI outlets on the circuit.
- Inspect and reseat the basket. Remove it fully, clean the contact area with a dry cloth, and push it back in until you feel a firm click.
- Disable child-lock and verify settings. Hold the lock button for three seconds to toggle child-lock off. Confirm temperature and time are set correctly for your recipe.
- Read any error codes. Note what’s on the display and look it up in the manual or the manufacturer’s support page. Error codes tell you exactly where the fault is — don’t skip this if a code is showing.
- Perform a hard reset. Unplug the air fryer for 60 seconds, then plug it back in. This clears temporary control board faults on most models.
- Clean the heating element and basket. Unplug, cool fully, then clean all accessible interior surfaces including the element area. Grease buildup simultaneously causes heating, smoking, and odour faults.
- Check placement and ventilation. Ensure at least five inches of clearance on all sides. Move the unit away from walls, cabinets, and other appliances.
- Test with a small, single-layer load. If the unit works correctly at low load but fails when full, overcrowding is the root cause.
- Check for firmware updates. For smart models, open the companion app and install any available updates. A 2026 connected-appliance report found firmware issues caused roughly 20% of smart air fryer support contacts — updates fix them in under two minutes.
- Contact the manufacturer. Gather your model number, purchase date, and a clear description of the fault. Most reputable brands offer a 1–2 year warranty and handle claims quickly.
Should You Repair or Replace Your Air Fryer?
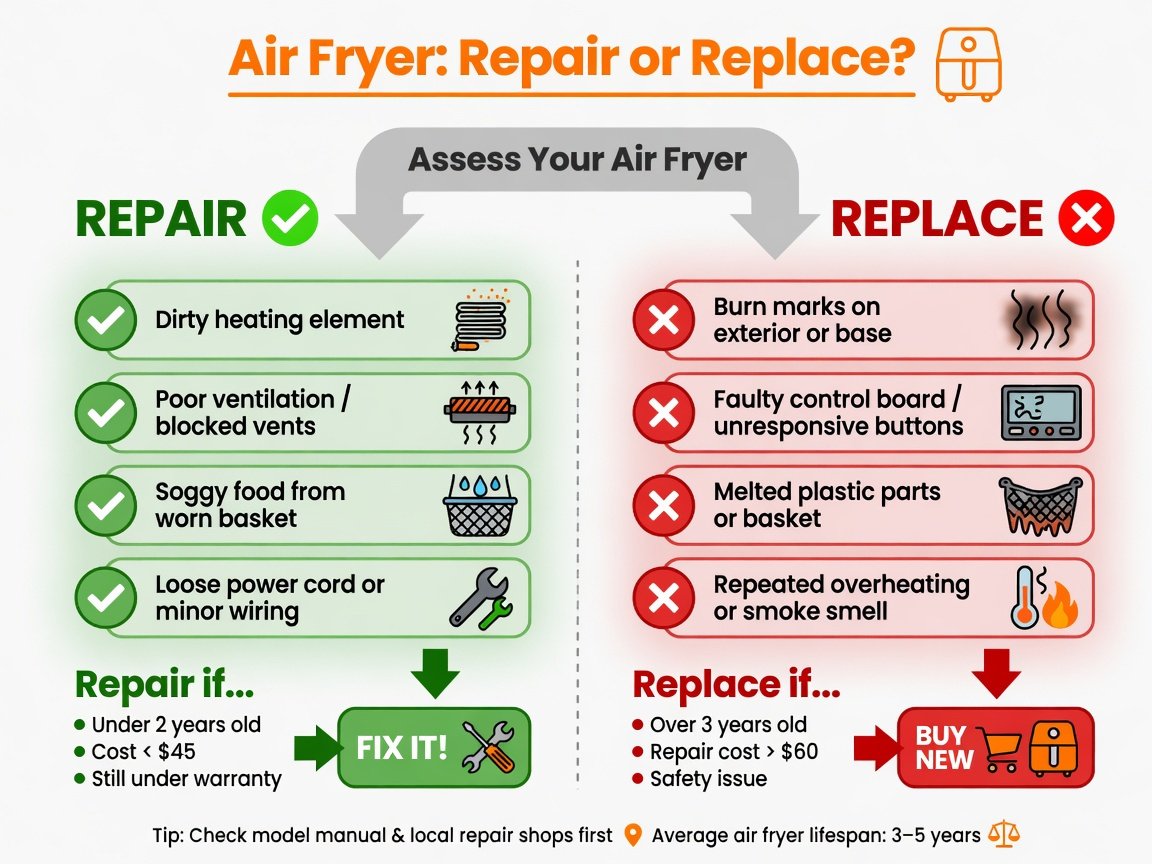
Most air fryer problems don’t require a replacement — but some do. The 50% rule is a practical benchmark borrowed from general appliance repair: if fixing the problem costs more than 50% of what a comparable new unit sells for today, replacement is the smarter financial decision. Consumer appliance analysts in 2026 note that the average price of a quality air fryer has fallen substantially over the past three years, which makes that tipping point arrive sooner than it once did on out-of-warranty units.
| Problem | Likely Fix | DIY or Pro? | Repair or Replace? |
|---|---|---|---|
| Won’t turn on | Outlet / basket sensor | DIY | Repair |
| Not heating | Clean heating element | DIY | Repair |
| Soggy food | Technique adjustment | DIY | Repair (no parts needed) |
| Light smoking | Water in drip tray + deep clean | DIY | Repair |
| Random shutoffs | Improve ventilation / clean vent | DIY | Repair |
| Rattling noise | Remove foreign object | DIY | Repair |
| Grinding fan noise | Fan bearing replacement | Pro (or warranty) | Repair if under warranty; replace if not |
| Faulty control board | Board replacement | Pro | Replace (typically exceeds 50% rule) |
| Burn marks / melted parts | None — unsafe to attempt | Do not use | Replace immediately |
When in doubt, open a warranty claim before spending anything on third-party repair. Many reputable brands replace faulty units within the warranty period at no cost, and some offer goodwill replacements for safety-related faults even outside the warranty window. Check your purchase receipt and product registration for exact terms before committing to a repair quote from an outside technician.
How to Prevent Air Fryer Problems Before They Start
Prevention consistently outperforms troubleshooting. Appliance lifecycle data from 2026 shows that air fryers maintained with regular cleaning and proper usage habits last an average of 40% longer than those used without routine care, and report significantly fewer performance problems across their first three years of ownership. The habits that produce this result are simpler than most people expect.
Clean the basket and drawer after every single use. Even a quick wipe-down with a damp cloth while the unit is still warm prevents the slow accumulation of grease that causes most long-term problems. Once a week with daily use, do a deeper clean: soak the basket in warm soapy water, use a soft brush on the heating element area, and dry everything thoroughly before reassembling. Never run the air fryer immediately after washing if any moisture remains inside — steam in the electrical compartment accelerates corrosion and can damage the control board over time.
A real-world example illustrates how much difference this makes. A home cook reported in early 2026 that her two-year-old air fryer had stopped crisping food, began shutting off randomly, and smelled of burning on startup. She was ready to throw it out. After a 45-minute deep clean that removed carbonised grease from the heating element, repositioning the unit 8 inches from the kitchen cabinet wall, and a 15-minute empty burn-off cycle at 400°F, the appliance performed identically to when it was new. Total cost: nothing. Three separate faults, one root cause, resolved in under two hours.
Air Fryer Technology in 2026–2027: How New Features Change Troubleshooting
Air fryer technology is evolving quickly, and newer features are creating troubleshooting categories that didn’t exist a few years ago. Smart air fryers with app connectivity, built-in food probes, and digital recipe integration are increasingly common in 2026. Industry analysts project that by 2027, more than 40% of air fryers sold in the UK and US will include some form of wireless connectivity — and each connected feature adds a potential failure point that earlier, simpler models simply didn’t have.
Firmware updates are now a routine first troubleshooting step for connected models. If your smart air fryer is behaving erratically — wrong temperatures, unresponsive controls, dropping its app connection — check for a software update before anything else. Manufacturers regularly push patches that fix bugs causing exactly these symptoms. A 2026 connected-appliance industry report found that firmware issues accounted for nearly 20% of smart appliance support contacts, most resolved by a two-minute update rather than any physical intervention.
Dual-basket models introduce their own quirks around sync cooking, heat distribution between zones, and load limits per basket. If you’re experiencing uneven results between zones, confirm the sync function is enabled correctly and consult the manufacturer’s guidance on maximum load per basket independently. Owners of feature-rich models like the Ninja Foodi 9-in-1 should also check whether a cooking-performance firmware update is available via the Ninja app before concluding there’s a hardware issue.
Frequently Asked Questions About Air Fryer Troubleshooting
Why is my air fryer not getting hot enough?
The most likely cause is grease buildup on the heating element. Unplug, let the unit cool fully, then inspect and clean the element with a soft brush. If the unit is more than 12 months old, temperature drift may be a factor — try cooking at 25°F above the recipe’s recommended setting and compare results. If neither resolves it, the heating element or its temperature sensor may need professional inspection.
Can I fix my air fryer myself or do I need a technician?
Most problems — power issues, dirty components, poor ventilation, and cooking technique adjustments — are fully DIY-fixable. Faults involving the motor, control board, internal wiring, or any visible electrical damage require professional service or a warranty claim. Never open the appliance housing yourself: doing so voids most warranties and introduces genuine safety risks.
Why does my air fryer trip the circuit breaker?
Air fryers draw 1,400–1,800 watts and will trip a breaker when a circuit is already near capacity. Move the appliance to a dedicated outlet on a circuit that isn’t shared with other high-draw appliances. If the air fryer trips a breaker even when used alone on a dedicated circuit, there may be an internal electrical fault — contact the manufacturer before using it again.
How often should I clean my air fryer to avoid problems?
Wipe down the basket and drawer after every use. Do a thorough clean — including the heating element area and interior walls — at least once a week with daily use, or after every five to seven cooks otherwise. Deep cleans take 15–20 minutes and prevent the large majority of performance problems, from heating faults to persistent bad smells.
What do E1, E2, or E3 error codes mean on an air fryer?
Error codes vary significantly by manufacturer and model. As a general guide: E1 often indicates a temperature sensor fault, E2 frequently points to a heating element issue, and E3 may signal overheating or a fan malfunction. Always check your specific model’s manual — the same code means different things on a Ninja versus a Cosori or Instant Vortex. Unplug for 60 seconds to clear temporary errors; a code that returns after a reset requires manufacturer support.
Is it safe to use an air fryer that is smoking?
Light white or grey smoke from cooking fatty foods is generally safe and stops when you add water to the drip tray or reduce the cooking temperature. Dark smoke, smoke with an electrical or burning-plastic smell, or smoke originating anywhere other than the basket area is a safety issue — unplug immediately and do not use the unit again until you have identified the source. When in doubt, stop cooking and contact the manufacturer.
How long should an air fryer last?
A well-maintained air fryer typically lasts 3–5 years with regular home use. Consistent cleaning, avoiding overcrowding, and using only silicone or wooden utensils on the non-stick basket push toward the upper end of that range. Budget models generally have shorter component lifespans than mid-range and premium units, but good maintenance habits extend the life of any tier.
Your Air Fryer Troubleshooting Action Plan
Nearly every air fryer problem has a straightforward solution — and most cost nothing and take under 10 minutes. The pattern is consistent across virtually every fault: check power, check the basket, clean the heating element, improve ventilation, and adjust cooking technique. Work through that sequence and you’ll resolve the large majority of issues before a repair or replacement ever becomes relevant.
- In the next 5 minutes: Check the outlet, reseat the basket firmly, look for any error codes on the display, and confirm the child-lock isn’t active.
- Today (20 minutes): Do a full deep clean — basket, drawer, interior walls, and the heating element area. Let every component dry completely before reassembling.
- This week: Reposition the air fryer with at least 5 inches of clearance on all sides. Commit to single-layer, appropriately sized batches. Pat food dry before it goes in the basket.
- After every future cook: Wipe down the basket and drawer while still warm. Empty and rinse the drip tray after any high-fat cook. Never run the unit with moisture inside.
- If problems persist: Check your warranty status and contact the manufacturer with your model number and a clear description of the fault. Most reputable brands handle warranty claims quickly, and many will replace rather than repair.
Air fryers are robust, straightforward appliances when they’re treated well. A few minutes of attention after each cook prevents almost every problem covered in this guide — and keeps your machine delivering the crispy, evenly cooked results it was designed for, every single time.
