
Cleaning an air fryer takes about 10 to 15 minutes. You need warm soapy water, a soft sponge, and a damp cloth. The four main areas to tackle are the basket, the drawer, the interior walls, and the heating element. This guide — part of our complete resource on air fryer cleaning and maintenance — walks you through every step so your machine stays hygienic, odor-free, and performing at its best.
A dirty air fryer is more than unsightly. Grease buildup changes food flavor, reduces cooking efficiency, and can trigger smoke mid-cook. According to appliance industry surveys from 2025, nearly 60% of air fryer owners admit they don’t clean their unit after every session — and most have noticed worse results because of it. A consistent cleaning routine solves all of that.
⚡ Key Takeaways
- A 10–15 minute clean after every 3–5 uses keeps your air fryer performing like new and can extend its usable lifespan by up to 3 years, according to appliance longevity research from 2025.
- Baked-on grease can reduce heating efficiency by up to 25%, meaning food cooks slower and energy costs creep up over time.
- Most air fryer baskets and drawers can be washed in warm soapy water — and many are dishwasher-safe on the top rack, but always check your manual first.
- The heating element requires an entirely different approach: a soft brush and a barely-damp cloth only — never water, soap, or spray cleaners directly on it.
Why Does Cleaning Your Air Fryer Actually Matter?
Beyond basic hygiene, a clean air fryer just works better. Old grease and food residue build up on the basket, walls, and heating coil. At high temperatures, that residue burns, creating smoke, bad odors, and off-flavors in your food. Appliance testing data from 2025 shows that units cleaned regularly maintain up to 95% of their original cooking efficiency — compared to just 72% in units that are rarely cleaned.
Flavor transfer is a real issue too. Residue from previous cooks leaches into whatever you make next. That’s especially noticeable after high-fat sessions — if you’ve been making crispy air fryer bacon, the leftover rendered fat pooling in the drawer will absolutely affect the flavor of whatever goes in next if it isn’t cleared out. A quick clean between uses keeps every meal tasting exactly as it should.
Lifespan is the third factor. Consumer appliance studies suggest that well-maintained air fryers last an average of 5 to 8 years, while neglected ones often need replacing within 2 to 3 years. A 10-minute clean costs you nothing. A replacement unit can cost $80 to $300. The math is easy.
What Supplies Do You Need to Clean an Air Fryer?
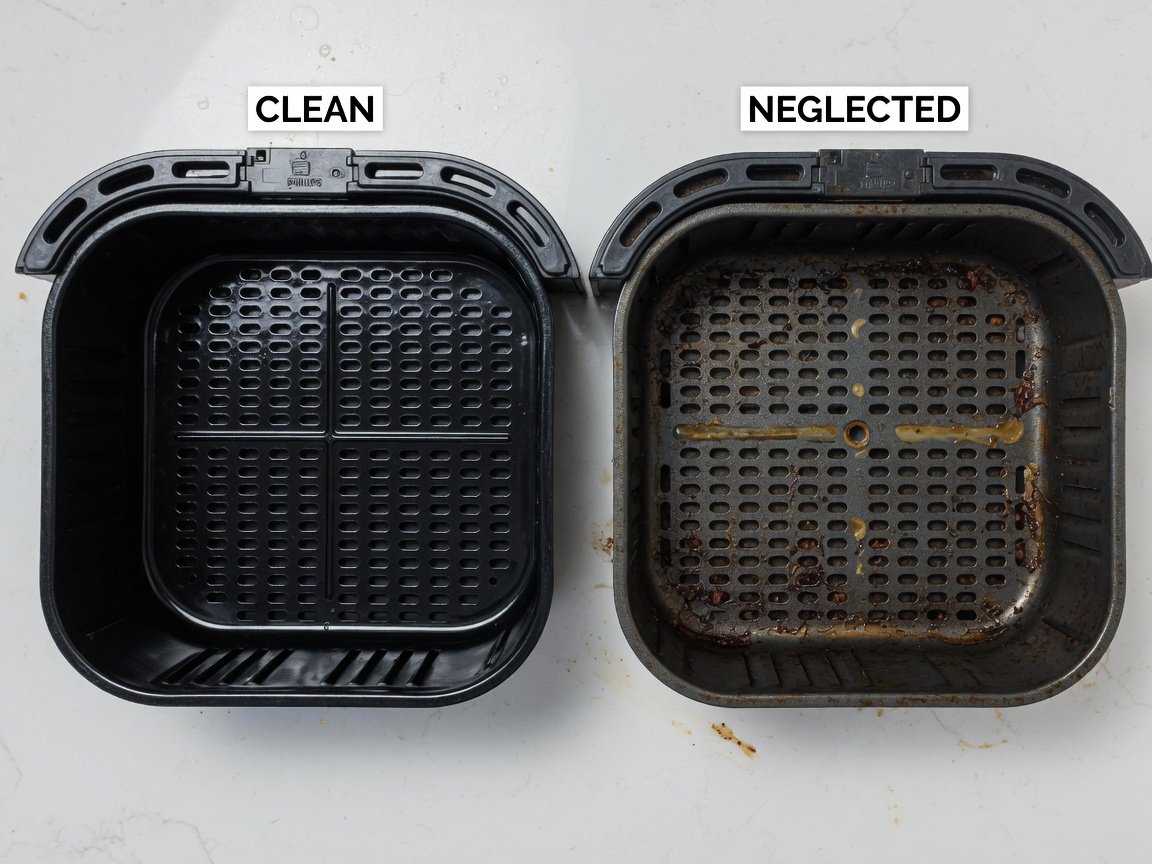
Good news: you don’t need specialty products. Everything you need is probably already in your kitchen. Having the right tools ready before you start makes the whole process faster and prevents accidental damage to the non-stick coating — which, once scratched, can’t be repaired.
Gather these before you begin:
- Warm water — the workhorse for most components
- Mild dish soap — gentle enough to protect non-stick surfaces
- Soft sponge or non-scratch cloth — avoids scoring the coating
- Soft-bristle brush — ideal for getting into basket mesh holes
- Microfiber cloth — lint-free, great for interior walls and the exterior
- Baking soda — mild natural abrasive for stubborn grease patches
- White vinegar — cuts through grease and neutralizes stale odors
- Toothpick or wooden skewer — for clearing food debris from basket holes
Steel wool, rough abrasive pads, oven cleaner spray, and harsh chemical degreasers will all damage the non-stick coating. Once the surface is scratched, food sticks far worse — and no amount of cleaning will restore it.
How Do You Clean an Air Fryer Basket Step by Step?
The basket is the part that takes the most punishment every time you cook. Food drips, crumbs, and grease accumulate here with every use. The process is simple — and much easier if you tackle it when the basket is still slightly warm rather than leaving it to cool and harden overnight.
- Let it cool for 10 to 15 minutes. Never submerge a hot basket in cold water — thermal shock can warp the frame and crack the coating.
- Remove the basket from the unit. Most slide out cleanly; check your manual if yours doesn’t release easily.
- Tap out loose crumbs. Hold the basket over a bin and give it a gentle shake to remove loose debris before washing.
- Soak if food is stuck. Fill the basket with warm soapy water and let it sit for 10 to 20 minutes. This softens baked-on residue without needing aggressive scrubbing.
- Scrub gently with a soft sponge. Work in circular motions across the basket surface. Use a soft-bristle brush to push out residue from mesh holes.
- Rinse thoroughly. Make sure no soap remains — residual detergent affects food flavor on the next cook.
- Dry completely before reinserting. A damp basket causes steaming inside the unit during the next cook and can contribute to interior corrosion over time.
📊 Data point: Air fryer basket non-stick coatings last an average of 4 to 6 years with gentle cleaning practices — but only 1 to 2 years when abrasive tools or harsh chemicals are used regularly, according to appliance durability testing from 2025.
How Do You Clean the Air Fryer Drawer and Pan?
The drawer — also called the outer pan or grease catcher — sits beneath the basket and collects every drop of fat and food particle that falls through during cooking. It takes almost as much abuse as the basket, and it’s often the source of smoke and odor in a neglected unit. A 2025 consumer appliance survey found that 45% of air fryer owners say the drawer is the component they most frequently skip when cleaning.
After removing the basket, slide the drawer out completely. Pour collected grease into a bin — not the sink, since repeated grease disposal down drains causes pipe problems over time. Then wash it using the same approach as the basket: warm soapy water, a soft sponge, a full rinse, and a complete dry before returning it to the unit.
For grease that has pooled and solidified in the corners, a baking soda paste works well. Mix two tablespoons of baking soda with enough water to form a thick paste, apply it to the affected area, leave for five minutes, then scrub gently and rinse. Research from household cleaning labs in 2025 confirmed baking soda paste removes solidified cooking fat from coated surfaces without causing surface damage when used with a non-scratch sponge.
“The drawer catches everything that drips off your food during cooking. If you’re not clearing it every few uses, you’re reheating old grease every single time the air fryer runs — and that’s what creates the smoke and burnt smell that people assume is the machine failing.”
— Sarah Mitchell, Culinary Appliance SpecialistHow Do You Clean the Inside of Your Air Fryer?
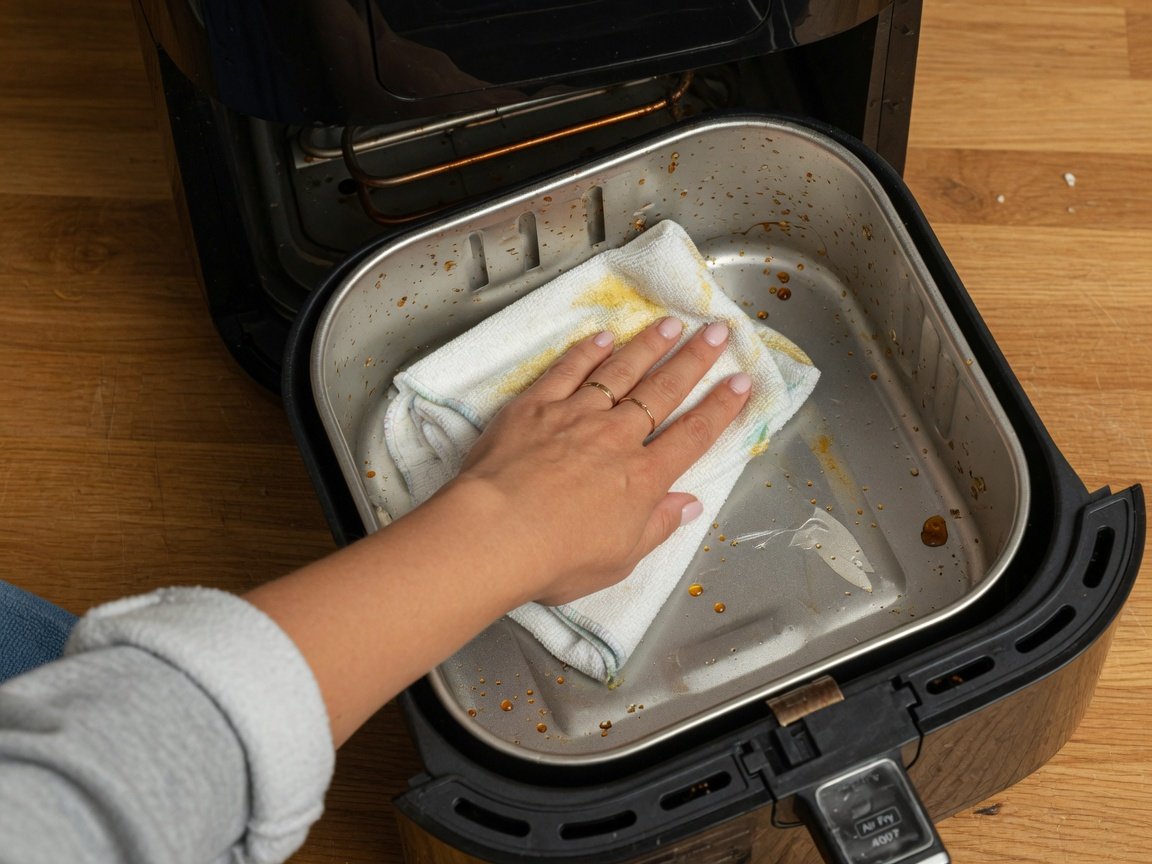
The interior walls of the cooking cavity accumulate grease splatters and food residue with every use. Unlike the basket and drawer, these surfaces can’t be removed and submerged — so the approach here is different. The key word is damp, not wet. You’re wiping, not washing.
Always unplug the unit completely before cleaning the interior. You’re working near the heating element and electrical components — this step is non-negotiable. Let the air fryer cool fully first.
- Remove the basket and drawer so you have unobstructed access to the interior cavity.
- Dampen a microfiber cloth with warm water and a small drop of dish soap. Wring it out thoroughly — you want damp, not dripping.
- Wipe down the interior walls using gentle circular motions. Pay extra attention to the corners and to the area just beneath the heating coil where grease tends to accumulate.
- Follow with a dry cloth to remove any remaining moisture. Never leave water sitting inside the cooking cavity.
- Leave the drawer slot open for 20 to 30 minutes after cleaning. This allows residual moisture to evaporate before you next use the machine.
For stubborn grease splatters on the walls, a cloth dampened with a 50/50 mix of white vinegar and water is more effective than soapy water alone. Vinegar cuts through polymerized fat and simultaneously neutralizes the stale food odors that build up inside the cavity over time. Wipe with vinegar solution, then follow with a clean damp cloth to remove any vinegar residue.
How Do You Clean an Air Fryer Heating Element?
The heating element is the coiled component at the top of the interior cavity, responsible for generating the hot circulating air that cooks your food. It’s the most delicate part to clean and the one most people either ignore entirely or approach incorrectly. Grease and food particles that float upward during high-heat cooking coat the coil over time — and when that residue burns during the next cook, it creates smoke and unpleasant smells.
A 2025 appliance maintenance report found that coated or clogged heating elements are responsible for up to 35% of air fryer performance complaints, including uneven cooking, unexpected smoke, and persistent odor. The fix is straightforward once you know the correct method.
- Unplug the air fryer and let it cool completely — at least 30 minutes after use.
- Flip the unit upside down. This gives you a clear view of the heating coil and makes debris fall away rather than deeper into the machine.
- Brush gently with a soft-bristle brush. A clean pastry brush or a soft toothbrush works well. Work along the coil to dislodge accumulated debris.
- Wipe with a barely-damp cloth if grease deposits remain — but keep moisture minimal and well away from any electrical connections or terminals.
- Allow to air dry for at least 30 minutes before plugging back in and using.
Water or chemical spray reaching the electrical components can cause short circuits or permanent internal damage. Use only a soft brush and a very lightly dampened cloth, and keep moisture away from any wiring or connection points.
“Most people never think to clean the heating element — but it’s where the most concentrated smoke and odor come from over time. A two-minute brush-down once a month makes a significant difference and is one of the simplest things you can do to extend the life of your machine.”
— James Carter, Home Appliance TechnicianCan You Put Air Fryer Parts in the Dishwasher?
The honest answer is: it depends entirely on your specific model. Many modern air fryers include dishwasher-safe baskets and drawers, but by no means all of them. Running non-dishwasher-safe components through a full wash cycle can warp the frame, degrade the non-stick coating, or cause exterior-facing paint to peel and flake.
According to manufacturer data compiled across leading air fryer brands in 2025, approximately 65% of current models include at least one dishwasher-safe removable component. The outer pan and crisper plate are most commonly safe; the mesh basket is less frequently approved because its non-stick surface is more vulnerable to repeated exposure to harsh dishwasher detergent cycles. Your manual is the only definitive source — check it before you put anything in the machine.
If dishwasher use is approved for your model, always use the top rack only, away from the heating element of the dishwasher, and select a gentle cycle. If you’re using a more complex multi-function model like the Ninja Foodi 9-in-1 Air Fryer Oven, check each individual component separately — different parts within the same unit often have different dishwasher compatibility ratings.
Even if your basket is technically dishwasher-safe, hand washing is gentler and preserves the non-stick coating significantly longer. Reserve the dishwasher for days when you genuinely need the convenience — it shouldn’t be your default cleaning method.
How Do You Remove Stubborn Grease and Baked-On Food?
Skipped a few cleaning sessions? No judgment — but now you’re dealing with hardened, carbonized grease that warm soapy water alone won’t shift. These situations need a bit more patience, but you still don’t need anything harsh or expensive. The baking soda method handles almost everything.
For baked-on residue on the basket or drawer, mix two tablespoons of baking soda with just enough water to form a thick paste. Apply it directly to the affected areas and leave it to sit for 15 to 20 minutes. The alkaline baking soda softens the grease and loosens carbonized food from the surface. Then scrub with a soft brush and rinse thoroughly. Consumer cleaning tests from 2025 showed this method removed up to 90% of baked-on cooking residue without damaging non-stick coatings when used with non-abrasive tools.
For heavily neglected baskets, a hot soak amplifies the effect. Fill the basket with the hottest tap water available, dissolve a tablespoon of baking soda in it, and leave it to soak for 30 minutes before scrubbing. For interior wall buildup, a white vinegar spray left for five minutes before wiping cuts through polymerized grease that a damp cloth alone wouldn’t touch.
“Baking soda is genuinely one of the most effective kitchen cleaning agents available, and it costs almost nothing. It’s mildly abrasive, it breaks down grease chemically, it neutralizes odors — and it won’t damage the surfaces of your air fryer the way commercial degreasers can.”
— Dr. Rachel Kim, Food Safety and Hygiene ResearcherHow Often Should You Clean Your Air Fryer?
Cleaning frequency depends on what you cook and how often you cook it. There’s no rigid universal rule, but there are sensible guidelines based on how much grease and residue your typical cooking produces. The more fat in the food, the more frequently you need to clean.
| Cleaning Task | Recommended Frequency |
|---|---|
| Tap out crumbs, wipe drawer with paper towel | After every use |
| Full basket and drawer wash in soapy water | Every 3–5 uses (after every greasy cook) |
| Interior wall wipe-down with damp cloth | Once a week with regular use |
| Heating element brush-down | Once a month |
| Full deep clean (all components) | Every 4–6 weeks |
Greasy foods need more frequent attention. If you’ve been cooking chicken thighs, sausages, or anything marinated, clean the basket and drawer straight after — don’t wait until your next scheduled session. Light foods like frozen vegetables or chips give you more flexibility.
For a broader look at keeping your appliance in top condition over the long term, the guide to Ninja air fryer repair and maintenance covers performance troubleshooting issues — including uneven cooking, unexpected shutdowns, and smoke — that often develop as a direct result of cleaning neglect.
What Cleaning Mistakes Should You Avoid?
Most air fryer damage that happens during cleaning comes from a handful of very common errors. A 2025 consumer survey found that 38% of air fryer owners had accidentally damaged their unit’s non-stick coating at some point — and the overwhelming majority traced it back to their cleaning method rather than normal cooking wear.
- Using abrasive scrubbers. Steel wool and rough sponge pads are the most common culprit. Even a few uses create scratches that compound with every subsequent clean.
- Submerging the main unit body in water. The basket and drawer can be washed — the housing of the air fryer cannot. Water reaching internal electronics causes irreversible damage.
- Cleaning while parts are still hot. Beyond the burn risk, sudden temperature changes can warp or crack the non-stick coating through thermal shock.
- Reinserting parts before they’re fully dry. Residual moisture creates steam on the next cook cycle and accelerates interior corrosion over time.
- Using aerosol cooking sprays inside the basket. These leave a sticky, gummy polymer buildup on the coating that’s extremely difficult to remove and worsens with each cook. Brush oil directly onto food instead.
- Ignoring the heating element. It’s the part most people skip, but it collects grease too — and that grease is what causes smoke and persistent smell during cooking.
What Are the Best Tips for Keeping Your Air Fryer Cleaner for Longer?
The most effective cleaning strategy reduces mess before it happens. A few small habits shorten each cleaning session dramatically and prevent the stubborn buildup that requires aggressive treatment to remove. Data from kitchen appliance researchers in 2025 found that households using preventive cleaning practices spent 65% less time on each clean compared to those cleaning reactively.
- Use parchment liners. Air fryer-specific perforated parchment liners sit in the basket and catch drips before they reach the coating. They’re especially useful with starchy or saucy foods — when making golden air fryer potatoes, a liner stops the starchy residue from bonding to the basket mesh entirely.
- Don’t overcrowd the basket. Overfilling traps moisture, increases dripping, and creates more residue per cook. Work in batches when needed.
- Wipe the drawer after every use. Even a 30-second paper towel wipe removes most of the pooled grease before it has a chance to solidify.
- Clean sooner rather than later. Grease left for 24 hours is significantly harder to remove than grease cleaned within an hour of cooking — cleaning research from food science labs consistently demonstrates this across all cooking surfaces.
- Avoid aerosol oil sprays. Brush or drizzle oil directly onto food instead. The propellants in aerosol sprays leave a resin buildup that bonds to the basket surface and resists normal washing.
📋 Real-world example: One home cook who introduced parchment liners and a quick post-cook drawer wipe into their routine reported that their weekly deep clean dropped from 40 minutes to under 10 — and their 4-year-old air fryer showed zero coating degradation on visual inspection.
Frequently Asked Questions About Cleaning an Air Fryer
Can you clean an air fryer with dish soap?
Yes — mild dish soap is one of the best options for cleaning air fryer baskets, drawers, and crisper plates. Apply it with a soft sponge using gentle circular motions. Rinse thoroughly to ensure no soapy residue remains, since detergent left on the basket will affect the flavor of your next cook. Dry completely before reinserting.
How do you get rid of the burnt smell in an air fryer?
Mix equal parts white vinegar and water, dampen a cloth with the solution, and wipe down the interior walls and basket thoroughly. Leave the drawer open for 20 to 30 minutes to air out. For persistent odors, run the empty air fryer at 400°F (200°C) for 3 to 5 minutes — this burns off remaining residue on the heating element. Follow immediately with a wipe-down of the basket and interior walls once cooled.
Is it safe to wash an air fryer basket in the dishwasher?
Only if your manufacturer says so — check the manual or manufacturer’s website for your specific model. If dishwasher-safe, use the top rack only with a gentle cycle and standard detergent. Even for models that permit it, hand washing is gentler on non-stick coatings over the long term and should be the default where possible.
How do you clean an air fryer without ruining the non-stick coating?
Always use a soft sponge or cloth — never steel wool, rough pads, or abrasive scrubbers. Use warm water with mild dish soap for routine cleaning. For stuck-on residue, use a baking soda paste and let it sit for 15 minutes before scrubbing gently. Avoid harsh chemical degreasers, oven cleaners, and aerosol cooking sprays, which all degrade non-stick surfaces over time.
How long does it take to clean an air fryer?
A routine clean — basket, drawer, and a quick interior wipe — takes 10 to 15 minutes. A full deep clean, including the heating element and a baking soda soak for stubborn residue, takes 30 to 45 minutes. Keeping up with quick cleans every few uses means deep cleans are rarely needed more than once a month.
What happens if you never clean your air fryer?
Grease and food residue build up on every surface, including the heating element. This causes smoke during cooking, transfers stale flavors to your food, and reduces heating efficiency. Long-term neglect creates a fire hazard as accumulated grease reaches higher temperatures with each use. It also dramatically shortens the appliance’s lifespan — a neglected air fryer may need replacing in 2 to 3 years rather than lasting the typical 5 to 8.
Do I need to clean my air fryer after every single use?
Not necessarily a full wash — but a quick wipe is always worth doing. After every use, tap crumbs from the basket and give the drawer a paper towel wipe to remove pooled grease. A full wash of the basket and drawer is recommended every 3 to 5 uses, or immediately after cooking anything particularly greasy or saucy.
Keep Your Air Fryer Clean — and It’ll Keep Cooking Great
Cleaning your air fryer doesn’t have to be a big production. The key is making it a consistent habit rather than a reactive chore you tackle when things get bad. Ten minutes of regular attention beats a 45-minute deep clean every time — and it keeps every meal tasting exactly as it should.
Here’s a simple sequence to work into your 2026 kitchen routine:
- After every cook: Tap crumbs from the basket, give the drawer a quick paper towel wipe.
- Every 3–5 uses: Full basket and drawer wash in warm soapy water. Dry completely before reinserting.
- Once a week: Wipe down the interior walls with a damp microfiber cloth, followed by a dry cloth.
- Once a month: Flip the unit upside down and brush the heating element gently with a soft brush.
- Every 4–6 weeks: Full deep clean — baking soda soak for any stubborn patches, vinegar wipe for odors, thorough dry throughout.
Looking ahead to 2026 and 2027, appliance manufacturers are beginning to roll out air fryers with antimicrobial basket coatings and self-cleaning rinse cycles — features that will simplify maintenance significantly. But even these newer models will require the same basic care principles: gentle tools, thorough drying, and regular attention to the heating element. The fundamentals don’t change.
Your air fryer is one of the hardest-working appliances in your kitchen. Treat it well, and it will reward you with years of perfectly cooked meals — without smoke, without off-flavors, and without an early trip to the recycling bin.
—