
If you use your air fryer a few times a week, the inside gets dirty fast. Grease spatters, crumbs fall, and baked-on residue builds up quicker than you’d expect. Knowing how to clean an air fryer inside properly isn’t just about hygiene — it directly affects how well your food cooks and how long your machine lasts. The good news? You don’t need special products or a lot of time. A few minutes of attention after each cook keeps the interior in great shape.
This guide covers every part of the inside of your air fryer — the basket, the drawer, the interior walls, and the heating element most people forget entirely — with clear methods for quick daily cleanups and tougher baked-on situations.
- Clean after every use — fresh grease wipes away in seconds; baked-on grease takes 20 minutes
- Baking soda paste is the most effective tool for stubborn residue that won’t scratch non-stick surfaces
- The heating element is the most commonly neglected part — and the single biggest source of smoke and burning smells
- Steel wool and chemical sprays permanently damage the interior coating — avoid both entirely
Why Does the Inside of Your Air Fryer Get So Dirty?
Air fryers work by circulating hot air at high speed around your food. That circulation catches every particle of grease, moisture, and food debris and distributes it across the interior walls, the drawer, and — especially — the heating element mounted above the basket.
Greasy foods are the biggest contributors. Bacon, chicken wings, sausage, and anything breaded all release significant amounts of fat during cooking. After just two or three cooks without wiping things down, that grease starts to bake onto every surface it touches. Once carbonized, it produces smoke, transfers burnt flavors to food, and over time can become a genuine fire risk.
Most air fryer manufacturers recommend cleaning after every single use for exactly this reason. Fresh grease wipes away with almost no effort. Grease that’s been baked on at 400°F for a week is a very different situation entirely.
What Supplies Do You Need to Clean Inside Your Air Fryer?
You don’t need anything special or expensive. Here’s what actually works:
- Warm water and mild dish soap
- A soft sponge or microfiber cloth
- A soft-bristle brush or an old toothbrush (for corners and mesh)
- Baking soda (the best tool for baked-on grease)
- White vinegar (optional — great for odor removal and loosening residue)
- A soft pastry brush or clean makeup brush (for the heating element)
The one thing worth emphasizing: avoid anything abrasive. Steel wool, scouring pads, and harsh chemical sprays strip non-stick coatings. Once that coating is damaged, it starts to flake into your food — and there’s no fixing it short of replacing the basket. Gentle tools used consistently are always more effective in the long run than aggressive scrubbing.
How Do You Clean the Inside of Your Air Fryer Step by Step?
Follow these steps in order and you’ll have a clean air fryer interior in under 10 minutes for a routine wipe-down, or 20–30 minutes for a deeper session.
- Unplug and cool completely. Wait at least 30 minutes after cooking. Cleaning a hot air fryer risks burns, and sudden temperature changes can warp or crack internal components.
- Remove the basket and drawer. Pull them out fully. If they’re heavily greased, put them straight into a sink of warm soapy water to soak for 10 minutes before scrubbing.
- Wipe down the interior walls. Dip a soft sponge or cloth in warm soapy water and wipe every interior surface you can reach — side walls, the bottom of the main cavity, and the interior ceiling area around the heating element.
- Scrub the basket and drawer. After soaking, scrub with a non-abrasive sponge. Focus on the mesh holes in the basket where grease loves to lodge — an old toothbrush works perfectly here for the corners and edges.
- Clean the heating element. Flip the air fryer upside down so you can see the coil clearly. Use a soft brush to dislodge any debris, then wipe with a barely-damp cloth. Full detail on this is in the dedicated section below.
- Rinse and dry everything thoroughly. All components need to be completely dry before you put them back. Air dry for at least 20 minutes, or towel-dry and then air dry for another 10.
- Reassemble and run a short test. Once everything is back together, run the empty air fryer at 350°F for 3 minutes. This burns off any remaining moisture or soap traces and confirms everything is working correctly.
How Do You Remove Baked-On Grease from the Air Fryer Interior?
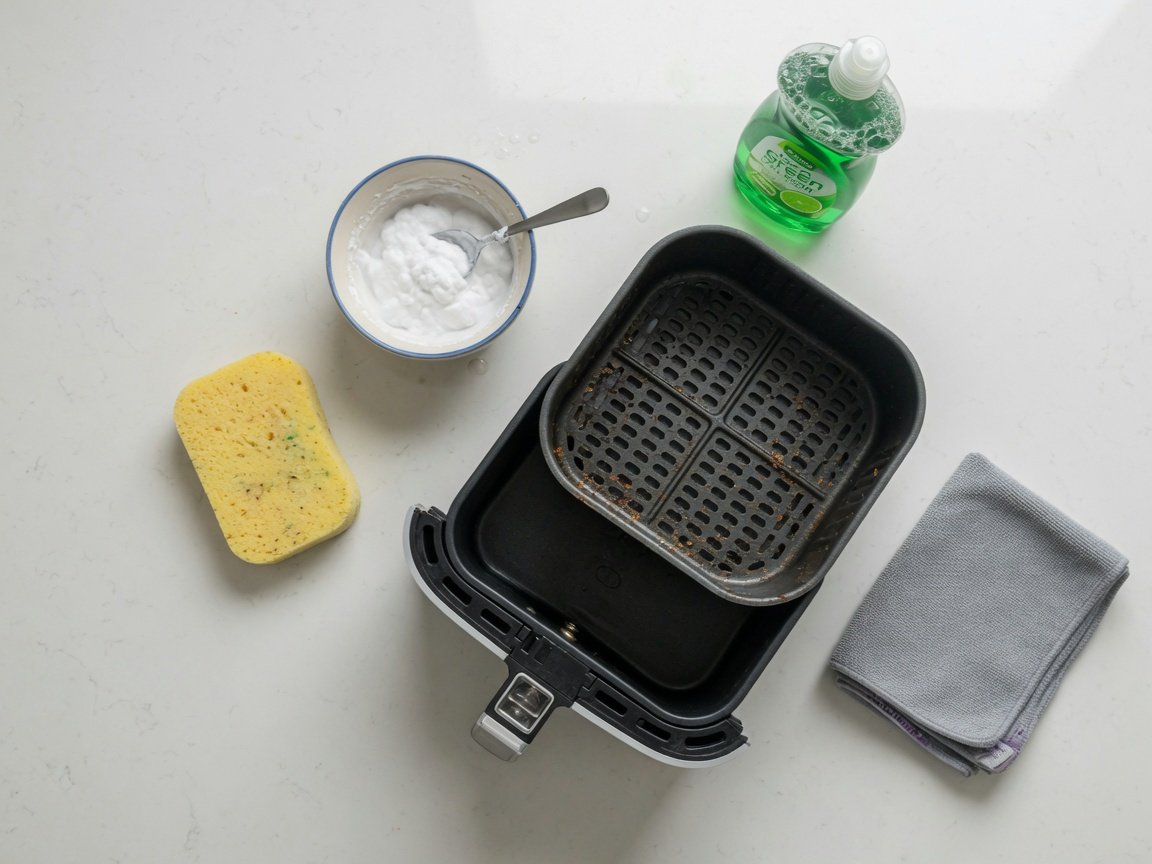
If warm soapy water isn’t shifting the residue, baking soda is the right tool. Mix 3 tablespoons of baking soda with 1 tablespoon of water to form a thick paste. Apply it directly to the problem areas, let it sit for 15–20 minutes, then scrub gently with a non-abrasive brush.
For the toughest spots, add a small splash of white vinegar on top of the baking soda paste. The fizzing reaction helps lift carbonized grease without requiring harder scrubbing — which is important because aggressive scrubbing is exactly how non-stick coatings get scratched and damaged.
A long soak also helps significantly. For a heavily used basket, 45–60 minutes in very hot soapy water softens baked-on residue to the point where it wipes away with minimal effort. This is especially useful after cooking something like chicken parmesan in the air fryer, which leaves behind a tough combination of melted cheese and breadcrumbs that bonds to the surface.
What’s the Right Way to Clean the Air Fryer Heating Element?
The heating element is the coil mounted inside the top of your air fryer — the part you can see when you look up into the main cavity. It collects just as much grease as the basket and drawer, but most people never clean it. Over time, this buildup is the single biggest cause of smoke and burning smells during cooking.
Here’s how to clean it safely:
- Make sure the air fryer is completely unplugged and cold
- Flip the air fryer upside down so you can see the heating coil clearly
- Inspect for grease buildup and carbonized food debris
- Use a soft-bristle brush — a clean pastry brush or toothbrush works well — to gently dislodge debris from the coil
- Wipe the surrounding area with a barely-damp cloth — never spray water directly onto the heating element
- Flip it back upright and allow it to air dry completely before plugging in
Never use metal tools on the heating element — the coil is delicate and easy to bend or break. If heavy buildup won’t come free with a soft brush, contact the manufacturer before trying anything more aggressive. For Ninja owners, model-specific guidance on the heating element and internal components is covered in detail in resources on Ninja air fryer repair and maintenance.
Can You Put Air Fryer Parts in the Dishwasher?
Many air fryer baskets and drawers are labeled dishwasher-safe — and technically they are, at least initially. The problem is that repeated dishwasher cycles degrade non-stick coatings faster than hand-washing. High heat and concentrated detergents are hard on these surfaces over the long run.
If your model’s manual confirms the basket is dishwasher-safe, placing it on the top rack on a gentle cycle is the safer approach. But hand-washing with warm, soapy water and a soft sponge will always extend the life of the non-stick coating more than the dishwasher will.
The main unit — the body of the air fryer that contains the motor and heating components — must never go in the dishwasher under any circumstances. It should only ever be cleaned by hand.
What Are the Best Air Fryer Cleaning Hacks?
Here’s a genuinely effective air fryer cleaning hack that most people haven’t tried: steam cleaning the inside. Pour 2–3 tablespoons of water and a small splash of white vinegar into the bottom of the drawer (not inside the basket), then run the air fryer at 350°F for 3–4 minutes. The steam loosens grease from the interior walls and basket mesh so it wipes away with barely any effort afterward.
A few more that actually work:
- Line the basket before cooking. Silicone liners or perforated parchment paper catch drips and crumbs before they hit the surface and bake on. This dramatically reduces how much cleaning every cook requires.
- Baking soda in the drawer. If you’re making something particularly greasy — like crispy bacon in the air fryer — sprinkle a small amount of baking soda in the bottom of the drawer beneath the basket before you cook. It absorbs dripping grease and makes post-cook cleanup almost effortless.
- Clean while still warm. Not hot — but once the air fryer has cooled to “warm” rather than “hot to the touch,” the grease is far easier to wipe away than it will be once it’s gone completely cold and hardened.
- Toothbrush for tight spots. The mesh of the basket and the corners of the drawer are notoriously difficult to reach. An old soft-bristle toothbrush gets into every spot your sponge can’t.
How Do You Clean Inside a Ninja Air Fryer?
The core cleaning method is the same regardless of brand, but cleaning a Ninja air fryer inside has some model-specific quirks worth knowing about before you start.
Most Ninja models use a basket-and-crisper-plate setup where the crisper plate — the perforated plate that sits inside the basket — is a separate, removable component. Both pieces need to come out and be cleaned individually. The mesh on Ninja crisper plates is fine enough to trap small food particles; a soft toothbrush under warm running water clears it effectively without forcing anything.
For multi-function models like the Ninja Foodi 9-in-1, there are additional surfaces to consider — including pressure-cooking lid seals if your model has them. Ninja officially marks most baskets and crisper plates as dishwasher-safe, though as noted above, hand-washing extends the life of the coating noticeably.
One Ninja-specific note worth remembering: some dual-zone models have two separate cooking drawers. Both zones need cleaning after every cook — it’s surprisingly easy to clean one side and forget about the other entirely.
How Often Should You Clean the Inside of Your Air Fryer?
Here’s a simple frequency guide to follow:
- After every use: Wipe the basket, drawer, and interior walls. This takes 5 minutes and is the single most important habit you can build.
- Every 5–7 uses (or weekly): A deeper clean — full soak of the basket, thorough scrub of the drawer, and a check on the heating element.
- Monthly: Full inspection and clean including the heating element, interior ceiling, and any corners where grease may have crept in unnoticed.
The type of food you cook matters a lot here. Vegetables and lightly-oiled foods leave minimal mess. Fatty proteins release significant amounts of grease — cooking Italian sausage in the air fryer, for example, produces quite a bit of dripping fat. After cooks like this, cleaning immediately rather than waiting is always the right call.
What Should You Never Use to Clean Inside Your Air Fryer?
Knowing what to avoid is just as important as knowing what works. These are the methods that cause permanent damage:
- Steel wool or metal scouring pads — scratch and permanently strip the non-stick coating in a single use
- Oven cleaner or bleach-based sprays — degrade non-stick surfaces and leave chemical residues that transfer directly to food
- Abrasive powdered cleansers — same mechanism and same damage as steel wool
- Water sprayed directly onto the heating element — creates a risk of electrical damage
- Submerging the main unit in water — destroys the electrical components entirely
- Magic erasers — mildly abrasive and damaging to non-stick coatings with any kind of repeated use
Once non-stick coating is scratched, it deteriorates progressively. Small flakes end up in food, and the coating’s ability to prevent sticking is permanently compromised. Replacing just the basket is possible for some models — but prevention through gentle cleaning is much cheaper and simpler than sourcing replacement parts.
Does the Type of Air Fryer Affect How Easy It Is to Clean Inside?
Yes — significantly. If you’re in the market for a new machine and cleanability matters to you, here are the features that make the biggest practical difference:
- Ceramic non-stick coating is more durable and easier to wipe clean than standard coatings, and it’s widely considered the safer long-term material choice
- Wide basket opening means your hand and sponge can actually reach every interior surface without awkward angles or blind spots
- Smooth interior walls wipe clean instantly — textured or embossed interiors trap grease in their recesses and require far more scrubbing
- Clearly separated, removable components make it easier to clean each piece properly rather than trying to reach around fixed structures with a cloth
If long-term cleanability and materials safety are priorities when choosing your next machine, it’s worth reading about the safest air fryer options available — models that use materials specifically designed for both cooking performance and longevity.
Frequently Asked Questions About Cleaning the Inside of Your Air Fryer
Can you use dish soap to clean the inside of an air fryer?
Yes. Mild dish soap with warm water is the best everyday cleaner for the basket, drawer, and interior walls. Avoid heavy-duty degreasers or anything with harsh chemical agents — these damage non-stick coatings over time and can leave residues that affect the taste of food.
How do you get rid of a burning smell inside your air fryer?
A burning smell almost always means grease buildup — most often on the heating element. Clean the element using the steps above, then run the steam hack: water and white vinegar in the drawer at 350°F for 3–4 minutes. The steam neutralizes lingering odors throughout the interior. Leaving a small open dish of baking soda inside the cold air fryer overnight also absorbs any stubborn smells that remain.
Is a magic eraser safe to use inside an air fryer?
Not really — at least not regularly. Magic erasers work through mild abrasion, and that abrasive action gradually damages non-stick coatings with repeated use. Stick to soft sponges and microfiber cloths for the interior surfaces.
Can you use baking soda inside an air fryer?
Yes, and it’s one of the most effective tools you have. As a paste mixed with water, it lifts baked-on grease without scratching. Sprinkled dry in the bottom drawer before cooking, it absorbs grease drips as they fall and makes post-cook cleanup much faster.
How long does it take to clean an air fryer inside?
A routine wipe-down after each use takes 3–5 minutes. A full clean — including the basket, drawer, interior walls, and heating element — takes 15–20 minutes when done regularly. If you’re dealing with significant baked-on grease buildup from skipped cleanings, budget 30–40 minutes to allow for proper soaking time.
The non-stick coating inside my air fryer basket is flaking — what should I do?
Stop using that basket immediately if the flaking is significant. Check whether your model sells replacement baskets separately — many brands do, and it’s far cheaper than replacing the entire machine. If replacement parts aren’t available, it’s time to consider a new air fryer, ideally one with a ceramic coating that’s more resistant to this kind of wear over time.
Keep It Clean and It Will Keep Cooking Well
Cleaning the inside of your air fryer regularly is one of the simplest ways to protect your investment and keep every meal tasting exactly as it should. A quick wipe after every cook, a proper scrub once a week, and a monthly check on the heating element — that full routine takes less than 30 minutes a month total.
Baking soda, a soft brush, and warm soapy water handle virtually every cleaning situation you’ll run into. The habits that cause real problems — skipping the heating element, scrubbing with abrasive pads, letting grease harden over several sessions — are all straightforward to avoid once you understand why they matter.
Try the steam hack on your next clean. Five minutes of warm steam does the work of twenty minutes of scrubbing. Your air fryer will thank you with consistent results every single cook.
—