
Deep cleaning your air fryer takes about 20–30 minutes and makes a dramatic difference in performance, taste, and safety. If your food has started tasting off, smoke is appearing mid-cook, or a persistent odor greets you every time you open the drawer, a thorough deep clean is exactly what your machine needs. This guide walks you through how to clean an air fryer from top to bottom — basket, heating element, interior walls, and exterior — using supplies you almost certainly already have at home.
Most air fryer owners do a quick rinse of the basket after each use, and that’s a good habit. But that quick rinse only handles surface residue. Over time, grease and food particles work their way into the basket perforations, the drawer housing, the interior chamber, and the heating coil itself. Left unchecked, that buildup affects airflow, reduces cooking efficiency, and can produce smoke or unpleasant smells even at moderate temperatures.
- Time required: 20–30 minutes for a complete deep clean
- Recommended frequency: Every 4–6 weeks for regular cooks; every 2–3 weeks after greasy meals
- Supplies needed: Dish soap, baking soda, white vinegar, a soft brush, and microfiber cloths
- Result: Restored airflow, eliminated odors, and food that tastes as good as the day you unboxed the machine
Why Deep Cleaning Your Air Fryer Matters More Than You Think
A dirty air fryer is more than a hygiene problem — it’s a performance problem. Air fryers work by circulating superheated air at high speed around your food. When grease coats the heating element or caked-on residue partially blocks the basket perforations, that circulation is disrupted. Your food cooks unevenly, takes longer, and often comes out soggier than expected.
There’s also a safety consideration that rarely gets mentioned. Grease accumulating near the heating coil can reach its smoke point during a cooking cycle, producing visible smoke and, in more extreme cases, a brief flash of flame. That’s not a worst-case scare story — it’s basic kitchen chemistry. Animal fats have relatively low smoke points, and they tend to collect in exactly the spots that get hottest. After cooking something as wonderfully greasy as perfectly crispy air fryer bacon, a thorough clean isn’t optional — it’s the responsible move.
Appliance maintenance research consistently shows that regular deep cleaning extends the working lifespan of kitchen appliances by 30–50%. For an air fryer that costs anywhere from $50 to $300 or more depending on the model, that’s real money protected by roughly 30 minutes of effort per month. The economics alone make the habit worthwhile.
What Supplies Do You Need to Deep Clean an Air Fryer?
The best news about deep cleaning an air fryer is that you don’t need any specialist products. The most effective supplies are already in your kitchen. Here’s what to have on hand before you begin:
- Dish soap — A standard grease-cutting formula. Any name brand or generic works equally well.
- Baking soda — Acts as a gentle abrasive that lifts baked-on grease without scratching nonstick surfaces.
- White vinegar — Cuts through mineral deposits, dissolves light grease, and neutralizes persistent odors.
- Soft-bristle brush or old toothbrush — For reaching into basket perforations and working around the heating coil. An old toothbrush is ideal for tight spots.
- Microfiber cloths — Lint-free and gentle. Use separate cloths for wet and dry steps.
- Wooden or silicone skewer — Useful for clearing stubborn debris from clogged basket holes without scratching the coating.
- Warm water — For soaking and rinsing components.
What to avoid entirely: steel wool, rough scrubbing pads, abrasive powdered cleansers, and harsh chemical sprays. Any of these can strip the nonstick coating from your basket and drawer in a single cleaning session. Once that coating starts peeling, it cannot be repaired. Stick to soft tools and mild solutions, and your air fryer will perform well for years.
How Often Should You Deep Clean Your Air Fryer?
Frequency depends heavily on what you cook and how often. A quick wipe-down after every use handles day-to-day surface residue, but that routine maintenance is not a substitute for a proper deep clean. For most households cooking 3–5 times per week, a deep clean every 4–6 weeks hits the right balance between effort and upkeep.
Cook greasy or heavily seasoned foods regularly — bacon, breaded chicken, sausages — and you should shorten that interval to every 2–3 weeks. These foods leave behind fat deposits that harden between uses and become significantly more difficult to remove the longer they stay in place. If Italian sausage in the air fryer is a weekly staple in your household, check the drawer and the area around the heating element more frequently than the calendar might otherwise suggest.
Beyond the calendar, three signs tell you a deep clean is needed right now regardless of when you last cleaned:
- Smoke appears during preheating or early in the cooking cycle when you haven’t cooked anything particularly smoky
- Food has a faint burning taste or off-flavour it didn’t have before
- The fan sounds different — laboured or irregular compared to when the unit was newer
Any one of those signals means the deep clean should happen today, not at the next scheduled interval.
How to Deep Clean the Air Fryer Basket Step by Step
The basket is the hardest-working component in your air fryer and takes the most punishment from heat, grease, and food contact. It gets its own dedicated process. Work through these steps in order for the best results.
- Unplug the air fryer and let it cool completely. Never clean a warm or hot unit — the nonstick coating is more vulnerable when it’s been heated. Give it at least 30 minutes after the last cook cycle, ideally an hour.
- Remove the basket and the outer drawer. On most basket-style models these separate easily — the basket unclips or lifts free from the drawer. If they seem stuck, check your model’s manual before forcing anything.
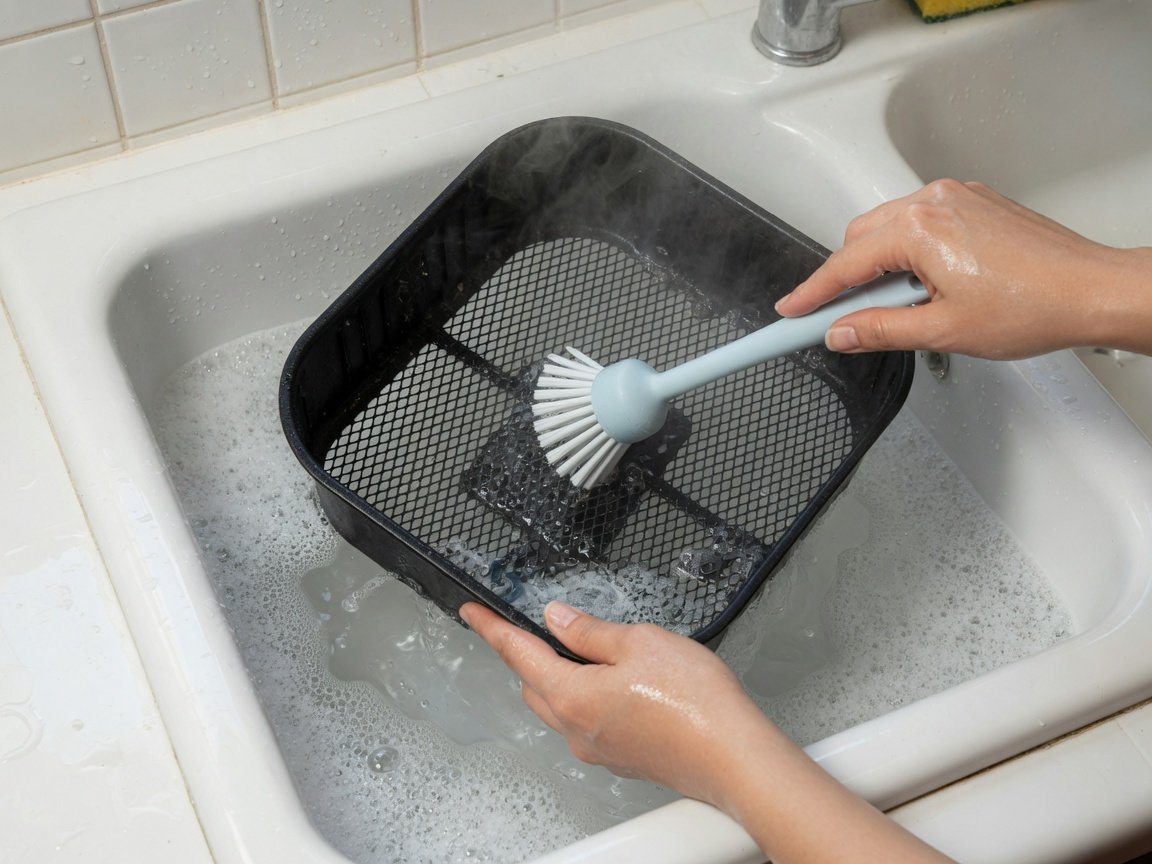
- Soak both pieces in hot soapy water. Fill your sink with hot water and a generous squeeze of dish soap. Fully submerge the basket and drawer and leave them for 15–20 minutes. This softens grease that has been baked on through multiple cooking cycles and makes scrubbing far easier.
- Scrub the basket perforations thoroughly. Use a soft-bristle brush or old toothbrush to work through each hole in the basket mesh. Grease hides in these openings and reduces airflow over time. A wooden skewer can push stubborn debris through from the inside out.
- Apply baking soda paste to problem areas. Mix 2 tablespoons of baking soda with just enough water to form a thick paste. Apply it to any spots with heavy or discoloured buildup, let it sit for 10 minutes, then scrub and rinse. This is one of the gentlest and most effective approaches to cleaning inside of air fryer surfaces without risking damage to the nonstick coating.
- Rinse both pieces thoroughly under warm running water. Keep rinsing until the water runs completely clear. Soap residue left on the basket will create off-flavours in your next meal.
- Dry completely before reassembling. Any moisture trapped in the drawer housing or around the heating area can cause smoking or odour on the next use. Air dry on a rack for 20–30 minutes, or hand dry with a clean microfiber cloth and confirm no water remains in any seam or corner.
How Do You Clean the Heating Element on an Air Fryer?
The heating element is the most important part of the deep clean and the part most people skip. It sits at the top of the cooking chamber in most basket-style air fryers, and it collects grease splatter every single time you cook. Even small amounts of baked-on fat on the coil cause smoke and contribute to the burned smell that makes food taste off.
Here’s how to clean it safely and effectively:
- Confirm the unit is unplugged and fully cooled. This step is non-negotiable when working near electrical components.
- Turn the unit upside down so you have a clear view of the coil. Position it on a clean towel to protect the exterior.
- Remove loose debris first. Use a dry soft brush or dry microfiber cloth to brush away any loose food particles or carbon deposits before introducing any moisture.
- Wipe the element gently with a barely damp cloth. The cloth should be damp, not wet. Work around the coil in light strokes, removing the grease film that accumulates there.
- Use a soft brush for stubborn spots. An old toothbrush dampened with a small amount of dish soap handles most baked-on residue. Light strokes — you’re loosening the buildup, not scrubbing hard.
- Wipe clean with a dry microfiber cloth. No moisture should remain on or near the element when you’re done.
- Run the empty unit at 350°F for 3–5 minutes before your next actual cooking session. This burns off any remaining trace residue and confirms everything is completely dry.
Never spray water or cleaning solution directly at the heating element, and never submerge the main unit body. These mistakes can reach the electrical components and permanently damage the machine. If you’re dealing with more than just cleaning — a unit that’s heating unevenly or failing to reach temperature — Ninja air fryer troubleshooting and repair tips can help you figure out what’s actually going on before you call it done.
What’s the Best Way to Remove Baked-On Grease?
Baked-on grease is the main reason people dread deep cleaning. It looks stubborn, and scrubbing harder never seems to help much. The good news: chemistry does most of the work when you use the right combination, and the result is always easier than it looks going in.
The most reliable air fryer cleaning hack for heavy grease buildup uses two ingredients you already have: baking soda and white vinegar. Apply a generous layer of baking soda paste to the greasy surface and let it sit for 15–20 minutes. Then spritz white vinegar over the top. The fizzing reaction that follows breaks the chemical bond between the hardened grease and the surface, making it easy to wipe or brush away with minimal effort. This method works on the drawer interior, the walls of the cooking chamber, and the outer surface of the basket.
For extremely stubborn spots, a second soak does more than harder scrubbing — and causes far less damage. Fill the basket with hot water and a tablespoon of dish soap, reassemble it in the drawer, and let the whole thing soak for a second 30-minute round rather than the initial 15. Then go back in with the brush. Patience beats force every time, especially on nonstick surfaces.
A preventative tip that experienced air fryer cooks swear by: line the outer drawer (not the basket itself — the basket needs airflow) with a small piece of aluminium foil or parchment paper before cooking anything particularly fatty. This catches drips before they can bake onto the surface during the cook cycle. It doesn’t replace the need to deep clean, but it significantly reduces how much you have to deal with when you do.
Can You Put Air Fryer Parts in the Dishwasher?
This question comes up constantly, and the honest answer is: it depends on your model and the specific part — but even when it’s technically allowed, it’s rarely the best idea for long-term care.
Most manufacturers mark the basket and outer drawer as dishwasher-safe. But that label comes with an asterisk. The dishwasher’s high-temperature wash cycles and caustic detergents degrade nonstick coatings significantly faster than careful handwashing does. A nonstick air fryer basket that goes through the dishwasher regularly will typically show visible coating wear within 6–12 months. That same basket, handwashed consistently in warm soapy water, can remain in solid condition for several years. The convenience trade-off is real, and most serious air fryer cooks decide it isn’t worth it.
If you do choose to use the dishwasher occasionally, follow these guidelines to minimise damage:
- Top rack only — bottom-rack cycles run significantly hotter
- Gentle or eco cycle rather than a heavy-duty wash
- Skip the heated dry setting entirely; let the parts air dry instead
- Use a mild dishwasher detergent rather than a heavy-duty formula
The main body of the air fryer — the housing that contains the fan and the heating element — should never go in the dishwasher under any circumstances. This applies regardless of what the label says. Water intrusion into the electrical components causes permanent damage.
How to Clean Different Types of Air Fryers
Not every air fryer is built the same way, and the cleaning approach varies slightly depending on the design. Here’s a quick comparison of the most common configurations:
| Air Fryer Type | Main Cleaning Challenge | Key Tip |
|---|---|---|
| Basket-style (single) | Grease trapped in basket perforations | Soak for 15–20 minutes; use a brush on every hole |
| Dual-basket models | Two baskets and two drawers to clean | Alternate soaking — do one basket while the other drains |
| Oven-style / toaster oven | Multiple racks, crumb tray, larger interior | Remove every rack and tray; clean crumb tray after every couple of uses |
| Multi-cooker combos | Pressure-cooking residue plus air fry grease | Inspect the sealing ring and lid separately; these trap odours |
Oven-style models like the Ninja Foodi 9-in-1 Air Fryer Oven have considerably more surface area to work through than a compact basket unit, but the underlying process is the same: remove every removable part, soak or wipe each one individually, clean the interior chamber with a damp cloth, and dry everything completely before reassembling. The crumb tray in oven-style models collects debris faster than most people expect — make it a habit to check and empty it every few uses, not just during full deep cleans.
How to Eliminate Odors From Your Air Fryer
Persistent odours in an air fryer nearly always trace back to one of two sources: residual grease that’s hitting its smoke point during subsequent cook cycles, or food particles hiding in spots you haven’t cleaned thoroughly. A complete deep clean handles both — but odour elimination sometimes needs an extra treatment step even after the hardware looks physically clean.
Three approaches that work reliably after a deep clean:
- Lemon steam method. Place a small oven-safe bowl of water with four or five slices of fresh lemon inside the basket. Run the air fryer at 350°F for 5 minutes. The steam loosens any residue you may have missed, and the lemon neutralises odours naturally without leaving a chemical smell behind.
- Vinegar wipe-down. After the unit is physically clean, wipe the interior walls with a cloth lightly dampened in white vinegar. Allow it to air dry completely — usually 20–30 minutes — before the next use. Don’t run the unit while it still smells of vinegar.
- Overnight baking soda soak. Place 2–3 tablespoons of dry baking soda in the clean, dry basket and leave it overnight with the drawer slightly open. Baking soda absorbs ambient odours passively. Discard it in the morning before cooking.
Fish odours deserve a special mention because they’re particularly tenacious. Fish oils penetrate surfaces more aggressively than most other fats, and a single thorough clean sometimes isn’t enough to fully clear them. The lemon steam method followed immediately by the overnight baking soda treatment — back to back — clears even stubborn fish smells in the vast majority of cases. If the odour persists after two rounds of this combination, the source is likely grease that has worked its way behind the sealing material around the drawer or into a gap near the heating coil, which requires a more targeted cleaning pass.
Common Deep Cleaning Mistakes That Damage Air Fryers
Most air fryer cleaning damage is entirely avoidable. These are the mistakes that cause real, lasting harm to your machine:
- Cleaning while the unit is still warm. The nonstick coating is more vulnerable to abrasion and chemical damage when it’s been recently heated. Always cool the unit completely — at least 30 minutes, ideally longer — before touching it with any cleaning tool.
- Using abrasive scrubbers. Steel wool and rough sponge pads strip the nonstick surface in a single session. The damage is irreversible.
- Spraying liquid directly at the heating element. Even a small amount of moisture in the wrong place can compromise the electrical components. Always dampen the cloth, not the appliance.
- Skipping the heating element entirely. This is the most common deep cleaning oversight and the main source of persistent smoke and off-flavours. The element needs attention every single deep clean, not occasionally.
- Not drying completely before reassembling. Moisture trapped inside the unit leads to mildew growth and can cause smoking or unusual odours during the next cook cycle. When in doubt, give it more time to dry.
- Using chemical oven cleaner. The lye-based compounds in standard oven cleaners are far too aggressive for air fryer surfaces. They damage the nonstick coating, discolour plastic components, and can leave chemical residue that transfers to food.
The difference between an air fryer that performs well for five-plus years and one that’s mediocre within eighteen months almost always comes down to cleaning habits. Small mistakes made consistently — even well-intentioned ones — add up to real wear. Getting the technique right from the start pays dividends for the entire life of the appliance.
Frequently Asked Questions
How do I deep clean an air fryer without damaging the nonstick coating?
Stick to soft-bristle brushes, microfiber cloths, and mild dish soap throughout the process. Avoid anything abrasive — rough sponges, steel wool, powdered cleansers, or hard-bristle brushes. Baking soda paste is your friend here: it provides just enough gentle abrasion to lift baked-on residue without scratching the nonstick surface. The key is patience — soak longer rather than scrubbing harder.
Can I use oven cleaner on my air fryer?
No. Standard oven cleaners contain highly caustic lye-based compounds that will damage both the nonstick coating and the plastic components inside an air fryer. They’re formulated for bare metal oven interiors, not appliances with protective coatings. Dish soap, baking soda, and white vinegar handle the same cleaning tasks without the risk.
How do I get rid of a burning plastic smell from my air fryer?
In a new unit, this smell is normal for the first two to three uses — it’s residual factory coatings and lubricants burning off. Run the empty unit at 350–400°F for 10 minutes in a well-ventilated space and it should clear. In an older unit that has developed this smell suddenly, deep clean the interior thoroughly and inspect for any plastic debris — twist ties, packaging fragments, or stray utensil pieces — that may have made contact with the heating element during a previous cook.
Is it safe to wash air fryer parts in the dishwasher?
Technically yes for most baskets and drawers, per manufacturer labelling — but regularly washing them in the dishwasher accelerates nonstick coating wear noticeably. Handwashing in warm soapy water extends basket life significantly. If convenience matters and you use the dishwasher occasionally, go top rack only, use a gentle cycle, and skip the heated dry function. Let the parts air dry after the cycle instead.
How do I clean the outside of my air fryer?
Wipe the exterior with a damp microfiber cloth. For greasy fingerprints or residue on the outside panel, a small amount of dish soap on the cloth cuts through it easily. The important technique: dampen the cloth, not the machine. Never spray water or cleaner directly at the unit. Dry with a separate cloth afterwards so no moisture sits on vents or the control panel.
My air fryer smells like fish even after cleaning — what should I do?
Fish odours are the most stubborn category because fish oils penetrate surfaces more deeply than most other fats. After a full deep clean, use the lemon steam method — a small bowl of water with fresh lemon slices at 350°F for 5 minutes — then immediately follow with an overnight baking soda soak in the dry basket. Two rounds of this back-to-back combination resolves fish smells in most cases. If it persists, do a second focused deep clean specifically targeting the seams around the drawer and the base of the heating element where oils can hide.
How do I clean a two-basket air fryer?
Treat each basket and its associated outer drawer as an independent unit and clean them one at a time. The process is identical to a single-basket model: soak each piece for 15–20 minutes, scrub the perforations, rinse thoroughly, and dry completely before reassembling. Some cooks alternate which basket handles the greasier foods each week, keeping one cleaner than the other — a small habit that reduces the effort involved in each deep clean.
The Bottom Line on Deep Cleaning Your Air Fryer
Deep cleaning your air fryer is a 20–30 minute investment that pays off every time you cook. It keeps food tasting the way it should, maintains airflow efficiency, prevents smoke and odour buildup, and extends the working life of an appliance most households use several times a week. The ROI on this one habit is genuinely hard to beat.
The process is straightforward: remove every removable part, soak and scrub the basket thoroughly, wipe down the heating element carefully, clean the interior walls with a damp cloth, dry everything completely, and reassemble. Do this every 4–6 weeks and follow up with quick wipe-downs after greasy meals, and your air fryer stays in peak condition indefinitely. Add the lemon steam or baking soda treatment whenever odours appear between deep cleans, and you’ve got a complete maintenance routine that takes almost no effort once it’s a habit.
One final point worth making: one of the biggest real-world advantages of an air fryer over traditional frying is how much easier the cleanup is. If you’ve ever wondered about the full picture — not just cleaning but cooking results and health factors — how air fryers compare to electric deep fryers covers the difference in detail. Either way, a clean machine is always the better machine, and now you know exactly how to keep yours that way.
— “`json